
My little cake pop story: I spent about six hours perfecting these cake pops for my daughter’s 21st birthday. I guess I never considered how I was going to transport these “sexy” things, so when I tried getting out the door, all 35 of them, with their perfectly gold sugar-dusted tops, crashed to the floor upside down. And although I put the 10 second rule into immediate effect, they were never quite the same. The good news is, I ate some before the spill – and I got a few photos for this post.
Four main things I want to share about making cake pops:
1. They are quite yummy and extremely goh-geous dahling.
2. If you haven’t used Wilton Candy Melts yet, you’ve got to try them, especially for cake pops. They are great to work with!
3. Before sticking and dipping the cake balls, I recommend letting them sit in the fridge overnight, as this simple step will make the experience way less stressful(trust me)!
4. Have a plan for how to hold the pops upright after coating – and how you are going to get them from point a to point b. I used a floral brick that you use to arrange flowers, but I think styrofoam would work too. It might be hard finding a special holder, but I’m sure they exist.
Anyway, cake pops are fun to make and special to look at. Although my daughter Jasmine didn’t see these cake pops at their best, I still had fun baking for my little girl, even though she’s not so little any more.

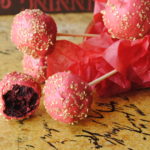
Sexy Red Velvet Cake Pops
Ingredients
- 2 1/2 cups cake flour it’s better with cake flour, but you can use all-purpose
- 1 1/2 cups sugar
- 1 teaspoon baking soda
- 1 teaspoon salt
- 2 heaping tablespoons unsweetened cocoa powder
- 1 1/2 cups vegetable oil
- 1 cup buttermilk room temperature
- 2 large eggs room temperature
- 2 ounces red food coloring
- 1 teaspoon white distilled vinegar
- 1 teaspoon vanilla extract
- Frosting you need one cup
- 1/2 cup whipping cream or half and half
- 1/2 teaspoon vanilla extract
- 2 cups sifted confectioners’ sugar more or less depending on desired consistency
- For the coating:
- 2-3 packets Wilton Candy Melts in color/flavor of your choice. For red velvet, I thought the red, chocolate mint, and white chocolate were fabulous! I purchased mine at a craft store.
- Sprinkles decorations of your choice - (I used gold colored sugar sprinkles)
- Other things you'll need:
- lolly pop sticks or little skewers I used 6 inch skewers and loved them
Instructions
- For the cake:
- Preheat oven to 350 degrees F and generously grease 12 inch cake pan.
- In medium bowl, sift flour, sugar, baking soda, cocoa and salt.
- In large bowl add oil, eggs, buttermilk, vinegar, vanilla extract, food coloring and beat on low with electric mixer until blended.
- Slowly add dry mixture and continue to beat until batter is smooth.
- Pour mixture in cake pan.
- Bake for about 35 minutes or until toothpick comes out dry when inserted in top, middle.
- Let cool, remove from pan.
- For cake pops, break up cake with hands or large spoon and put in mixing bowl. Make sure cake is cooled completely.
- Prepare frosting: beat cream, sugar and vanilla in bowl until smooth. Make sure it has a typical frosting texture.
- Further crumble the cake with your hands in the bowl until very crumbly. If you find corner pieces, just discard.
- Still using your hands, mix the 1 cup of frosting into the cake crumbs and mix well. It's messy, but necessary.
- Using a tablespoon measure, scoop out heaping tablespoon, form a round ball, and place on tray lined with parchment paper. Repeat until mixture is used up.
- Cover with plastic wrap and let sit in fridge for a minimum of 6 hours (preferably overnight).
- When ready to coat, prepare the candy melts according to package directions. I used the microwave and they came out fine. I liked the texture of the melts, but you may want to thin with oil if too thick (see package instructions).
- Dip 1/2 inch of stick in the coating and then stick that same end in the cake ball, making sure to not go all the way through. I suggest inserting more than halfway.
- To coat, I used a tablespoon (that you eat with). Using left hand, scoop the coating in the spoon and with your right hand twirl the top of the pop into the spoon filled with coating. Rotate for an even coat. You'll get the hang of it after you do a couple!
- Now sprinkle the pop with topping of your choice.
- Let them rest upright by sticking them in the holder.
- Voila! You will make someone really happy now!

Hi Garlicgirl,
Thanks you for your post, This delicious cake is a Southern specialty and has been in my family for many generations. In the early days, red velvet cake was the signature dessert in upscale restaurants and hotels. But today this rich and sweet dessert topped with cream cheese frosting is enjoyed at many celebrations. This moist cake is a good choice to serve for special occasions, and is perfectly suited for your Easter feast.
Kindest Regards
These are beautiful!!! I can’t even imagine that transforming them made them look or taste too bad. I had to transfer some of my once, (NOT 38 of them). I used an egg carton and pushed the non-cake end into the place where the eggs go. (Carton was upside down).
My granddaughters are visiting tomorrow and we are going to so make these. thanks for sharing.
(My daughter is 36 and she is still a little kid to me!!)
Thanks Vicky! And your egg carton sounds like a good idea for transporting! have fun making them!
Hi! I was wondering how pastry flour works with this!
Hi Chloe,
I’ve never used pastry flour for cake pops so I can’t say for sure. If you’re worried about the high protein content, I would just mix it with all purpose flour to balance things out. If you use it, I’d love to hear the results!
Jodi
This recipe sounds delicious. I have a cake pops machine. Can I use this recipe without frosting to make pops?